Unveiling the Artistry of a 3D Mandala 3D Papercut Mandala
The intersection of traditional craftsmanship and modern digital precision has given rise to intricate designs that captivate both the eye and the hand. Among these innovations, the 3D Mandala 3D Papercut Mandala stands out as a testament to what is possible when geometry meets artistic vision. This is not merely a flat image; it is a layered experience that transforms simple paper into a dynamic, three-dimensional object. For professionals, hobbyists, and educators alike, understanding the nuances of this design opens a world of creative possibilities.
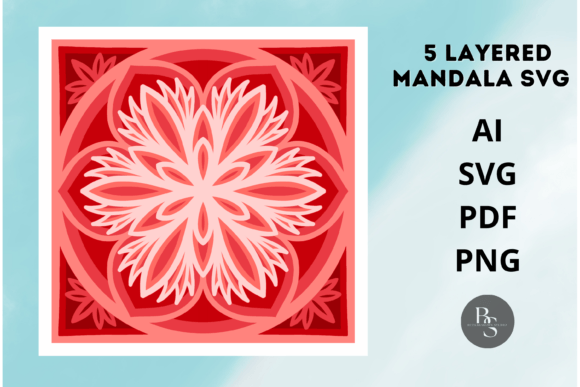
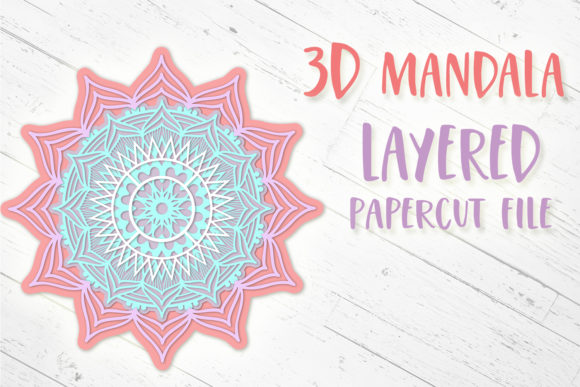
This specific 3D Papercut Mandala is a detailed papercut design characterized by its depth and complexity. Unlike standard single-layer cutouts, this piece utilizes five distinct layers to create a sense of volume and perspective. The result is a visual illusion where elements appear to float above one another, creating a rich tapestry of shadows and highlights that changes as the viewer moves around it. Whether used in a commercial setting or a personal project, the impact of such a design is immediate and profound.
Understanding the Architecture of Depth
To appreciate the utility of this design, one must first understand how it functions. The core characteristic of this 3D Mandala 3D Papercut Mandala lies in its multi-layered construction. The design consists of exactly five layers, each serving a specific purpose in the overall composition. These layers are not random; they are strategically arranged to guide the eye through the center of the mandala, drawing attention inward while maintaining structural integrity.
The process of assembling these layers requires patience and precision. Each layer acts as a frame for the next, allowing the intricate details of the inner circles to be revealed gradually. This technique mimics the way light filters through a stained-glass window, but with the added dimension of physical space between the sheets. The separation between layers creates natural shadows, which enhances the contrast and makes the design pop off the surface. This is particularly effective when placed against contrasting backgrounds, where the depth becomes even more pronounced.
For those who have never attempted a multi-layer papercut project, the five-layer structure offers a manageable challenge. It provides enough complexity to be impressive without becoming unmanageably difficult to assemble. The balance between detail and feasibility is key here, ensuring that the final product looks professional regardless of the assembler's skill level.
Practical Applications Across Industries
The versatility of the 3D Papercut Mandala extends far beyond simple decoration. Its ability to add texture and dimension makes it a valuable asset for various industries, from fashion to interior design. The design is not confined to a single medium; rather, it adapts seamlessly to different surfaces and formats.
- Custom Greeting Cards: One of the most popular uses for this design is on high-end greeting cards. By incorporating the five layers into a card fold, creators can produce a surprise element that unfolds to reveal the full depth of the mandala. This adds an emotional weight to the message, making the card a keepsake rather than disposable paper.
- Home Decor: In the realm of interior design, these mandalas serve as stunning wall art. When mounted on a wall with spacers between the layers, they cast interesting shadows that change throughout the day as sunlight moves across the room. They can also be used as decorative accents on shelves, bookends, or lampshades, adding a touch of bohemian elegance to any space.
- Fashion and Apparel: The adaptability of the design allows it to be printed on T-shirts and other fabrics. While a flat print is common, using the layered concept in embroidery or appliqué work can bring a unique tactile quality to clothing. The geometric nature of the mandala appeals to modern minimalist aesthetics, making it suitable for streetwear or formal wear alike.
- Educational Tools: Educators can utilize this design to teach concepts of geometry, symmetry, and spatial reasoning. Students can physically construct the layers to understand how two-dimensional shapes create three-dimensional illusions. It serves as an excellent bridge between art and mathematics.
Technical Specifications and Workflow Efficiency
For professionals working with digital cutting machines, the technical specifications of a file are just as important as its aesthetic appeal. The 3D Mandala 3D Papercut Mandala comes equipped with files in multiple formats: EPS, SVG, DXF, and PNG. This variety ensures compatibility with a wide range of software and hardware, from vector editing programs like Adobe Illustrator to direct-to-machine workflows for brands like Cricut and Silhouette.
The inclusion of EPS and SVG files is crucial for vector-based scaling. These formats allow the designer to resize the mandala to any dimension without losing resolution or clarity. Whether you are cutting a tiny charm for a bracelet or a massive banner for an event, the lines remain crisp. The DXF format is particularly valuable for users working with industrial laser cutters or CNC routers, providing precise coordinates for the machine to follow.
A significant advantage of this specific design is the optimization of the cutting path. The cutting points were reduced to a minimum. In the world of papercutting, "cutting points" refer to the places where the blade must stop, lift, and reposition to start a new line. Excessive cutting points can lead to longer production times and increased wear on the blades. By minimizing these interruptions, the cutting process will be a lot faster. This efficiency translates directly to cost savings for businesses producing items in bulk and saves time for hobbyists who want to complete their projects quickly.
Furthermore, the reduction of cutting points often results in cleaner edges. When a blade stops frequently, there is a higher risk of the material shifting slightly or the blade dragging, which can cause jagged lines. A streamlined path ensures a smoother finish, reducing the need for post-processing or manual cleanup.
Guidance for Assembly and Usage
While the digital files provide the blueprint, the physical assembly brings the design to life. To ensure the best results, it is essential to follow the instructions provided within the design package. Please view the third preview for instructions on how to use this design. This specific preview typically contains step-by-step diagrams showing the order of assembly, recommended adhesives, and spacing techniques.
The assembly process generally involves the following steps:
- Cutting: Load your chosen material (cardstock, vinyl, or fabric) into the cutting machine. Ensure the settings match the thickness of the material to prevent tearing or incomplete cuts.
- Weeding: Remove the excess material from around the design. With a complex mandala, this step requires care to avoid pulling out delicate inner pieces.
- Layering: Arrange the five layers in the correct order. Typically, the largest outer layer goes down first, followed by progressively smaller inner layers.
- Spacing: Use foam adhesive dots or small spacers between the layers to create the desired 3D effect. The height of these spacers determines the depth of the final image.
- Adhesion: Secure the layers together. If mounting on a background, ensure the base layer is firmly attached to prevent warping over time.
Following these steps carefully will yield a professional-grade result. The instructions in the third preview are designed to be user-friendly, catering to both beginners who may be encountering this technique for the first time and experts looking for a quick reference.
Considerations for Material Selection
The success of a 3D Papercut Mandala project often depends on the materials chosen. Because the design relies on five layers, the stiffness and durability of the paper are critical. Standard printer paper may be too flimsy to hold the shape of the layers, leading to sagging or collapse. Instead, heavy-weight cardstock, bristol board, or specialty papercutting paper is recommended.
For outdoor applications or items that require durability, such as T-shirts or home decorations exposed to humidity, vinyl or laminated paper might be necessary. The choice of color also plays a role. Monochromatic schemes highlight the shadows and depth, while multi-colored layers can create a vibrant, rainbow-like effect. However, if using multiple colors, it is important to consider how the colors interact when viewed through the gaps of the upper layers.
Another consideration is the scale of the project. A large-scale installation requires robust support structures to keep the layers aligned. Small-scale items, like jewelry or tags, demand extremely fine cutting tools and steady hands. The 3D Mandala 3D Papercut Mandala is scalable, but the tooling must match the size of the intended output.
The Intersection of Tradition and Innovation
Mandalas have a history spanning thousands of years, originating in Hindu and Buddhist traditions as symbols of the universe. Traditionally, they were drawn with sand or ink, focusing on meditation and spiritual alignment. The modern interpretation, however, blends this ancient symbolism with contemporary technology. The 3D Mandala 3D Papercut Mandala represents this fusion perfectly.
It retains the spiritual and meditative qualities of the original form—the circular symmetry, the infinite patterns—but introduces a physical dimension that invites interaction. It transforms a passive symbol into an active object. This shift resonates with today's audience, who value experiences and tangible connections. Whether used in a therapy session, a classroom, or a living room, the mandala serves as a focal point for contemplation and creativity.
The ability to mass-produce these designs via digital cutting machines does not diminish their artistic value; rather, it democratizes access to high-quality art. Creators who previously could not afford custom-made installations can now produce their own versions using accessible technology. This accessibility fosters a community of makers who share ideas, variations, and techniques, further enriching the cultural landscape of papercutting.
Maximizing Creative Potential
As you explore the possibilities of this design, remember that the 3D Papercut Mandala is a starting point, not a limitation. You can experiment with lighting behind the layers to create glowing effects. You can combine multiple mandalas of different sizes to create a cluster effect. You can even integrate other media, such as watercolor washes or metallic inks, onto the paper before cutting.
The reduced cutting points mentioned earlier mean that you can iterate quickly. If you want to test a new color combination or adjust the spacing between layers, the efficiency of the file allows you to do so without wasting excessive time or material. This encourages experimentation, which is the heart of innovation. Professionals can use this speed to meet tight deadlines, while hobbyists can enjoy the satisfaction of completing a project in a single afternoon.
In conclusion, the 3D Mandala 3D Papercut Mandala is more than just a set of digital files. It is a comprehensive solution for anyone looking to add depth, beauty, and meaning to their projects. With its five-layer architecture, optimized cutting paths, and versatile file formats, it bridges the gap between digital design and physical reality. Whether you are crafting a gift, designing a brand identity, or teaching a class, this design offers a reliable and inspiring foundation for your work.